Cleaning the Spray Chamber
The spray chamber requires regular preventative maintenance. Agilent recommends cleaning the spray chamber on a weekly to monthly basis, depending on use.
The wetting of a spray chamber is its ability to remove aerosol that touches the internal surfaces of the spray chamber.
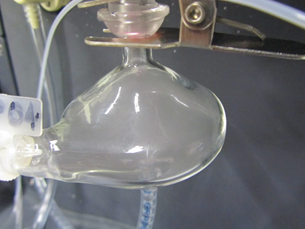
While an acidified aqueous solution is nebulized, a correctly wetting spray chamber shows a uniform internal surface without a large droplet formation (Figure 1).
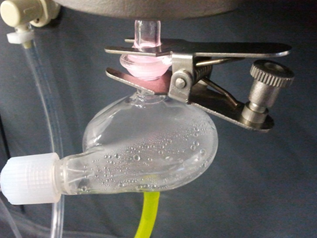
A poorly wetting spray chamber is usually indicated by the appearance of large droplets on the internal surfaces of the spray chamber (Figure 2).
 |
 |
|
Figure 1. Correctly ‘wetting’ spray chamber with a uniform coverage |
Figure 2. Incorrectly ‘wetting’ spray chamber showing droplets |

|
Chemical Hazard Nitric acid is very corrosive and can cause severe burns when it comes into contact with the skin. It is essential that appropriate protective clothing be worn at all times when handling acid. If acid contacts the skin, wash off with copious amounts of water and seek medical attention immediately. |

 |
If you routinely analyze both aqueous and non-aqueous, non-miscible solutions, the use of two spray chambers, one for aqueous solutions and one for organic solutions, will significantly reduce the instrument downtime due to spray chamber cleaning. |
|
It is highly recommended to always handle sample introduction system using clean, powder free latex gloves. This is recommended not only for the safety of the operator, but also to ensure reliable performance of the sample introduction system. |
 |
This video demonstrates how to clean the spray chamber. |
To clean the spray chamber:
- Turn the pump and plasma off.
- Disconnect the spray chamber from the instrument. Remove the nebulizer and any associated tubing and adaptors from the spray chamber. See the Figure below.
- Prepare an aqueous solution of a quality laboratory alkaline detergent. Use a container of sufficient capacity to allow the complete immersion of the spray chamber.
- Completely immerse the spray chamber in the solution, ensuring all the internal surfaces of the spray chamber are in contact with the detergent solution.
- For single pass spray chambers the container may be placed in an ultrasonic bath and sonicated for 40 minutes.
- For multiple pass spray chambers do not sonicate, instead allow the spray chamber to stand overnight in the detergent solution.
- With gloved hands remove the spray chamber from the detergent solution and then rinse thoroughly with ASTM Type 1 water.
- Dry external surfaces using a clean, lint free paper towel. Do not dry the spray chamber using compressed gases.
- Reattach all tubes, adaptors and the nebulizer and reconnect the assembly to the instrument.
- Test the wetting of the cleaned spray chamber by nebulizing an acidified aqueous solution. If large droplets are still detected on the internal surfaces repeat the cleaning process outlined above.
|
It is not unusual that some spray chambers will require extended cleaning. |
- If the spray chamber is not going to be used immediately after cleaning, store the spray chamber in an appropriate covered vessel containing a 1% HNO3 solution until required or, after rinsing with ASTM Type 1 water, dry the external surfaces of the spray chamber with a clean, lint free paper towel and store in its original packaging.
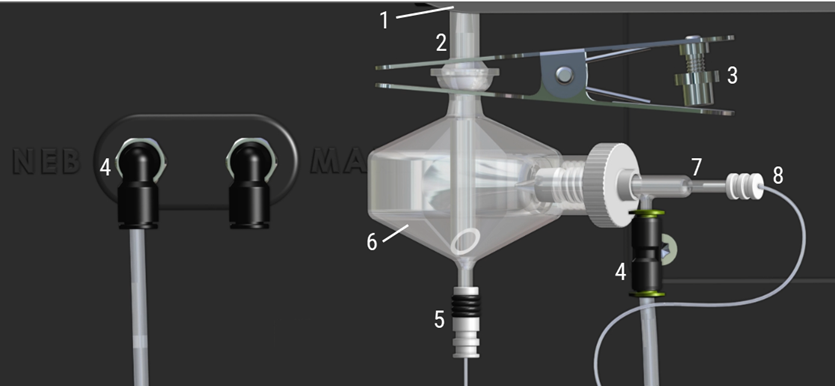
Torch, spray chamber and nebulizer connections
Where:
|
1. Torch loader handle |
4. Gas connection to nebulizer |
7. Nebulizer |
|
2. Torch |
5. Spray chamber drain tubing |
8. Solution tubing from peristaltic pump |
|
3. Torch clamp |
6. Spray chamber |
|