Replacing the Axial Pre-optics Window
The axial pre-optics window protects the internal components from particulates and fumes from the plasma.
 |
Always turn off your instrument before attempting to the window and do not operate the instrument while the window is removed. |
There are three steps to the procedure:
- Removing the axial pre-optics window assembly
- Replacing the axial pre-optics window
- Installing the axial pre-optics window assembly
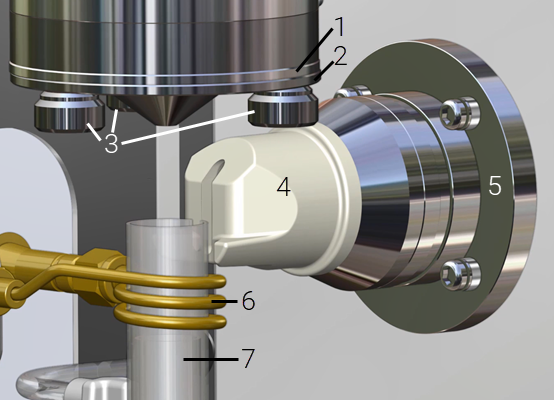
Figure 1. Torch compartment
Where:
|
1. Cone |
4. Snout |
7. Torch |
|
2. Axial pre-optics window assembly |
5. Radial pre-optics window assembly |
|
|
3. Cone thumb screws |
6. RF coil |
|
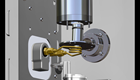 |
This video demonstrates how to replace the axial pre-optics window assembly. |
To remove the axial pre-optics window assembly:
- Turn off the ICP-OES instrument.
  |
Hot Surface |
|
Do not hit the RF coil when performing this procedure. |
- Remove the torch and snout. See Figure 1.
- Undo the three thumb screws holding the cone in place.
- Pull the cone down out of the assembly.
- Gently pull down on the axial window assembly.
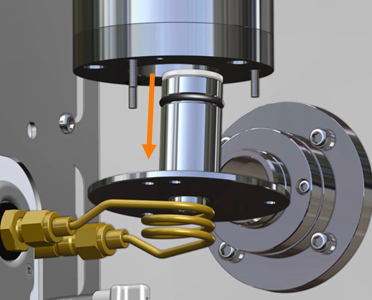
Figure 2. Axial pre-optics window assembly removal - Tilt the top of the assembly towards the back and then slide to the right to remove it from the torch compartment.
- Check the axial pre-optics window for contamination. Replace or clean if needed.
To replace the axial pre-optics window:
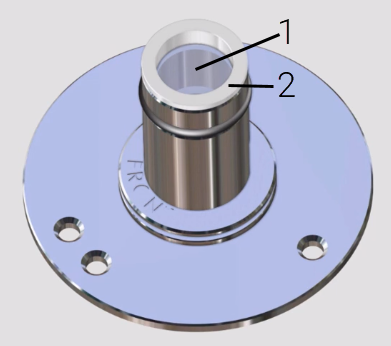
Figure 3. Axial pre-optics window assembly
Where:
|
1. Axial pre-optics window |
2. Axial window nut |
- Unscrew the axial window nut from the assembly.
- Remove the axial pre-optics window from the assembly. It should slide out easily.
|
Always wear gloves when replacing the window. Hold the window by the edges only. Oils from your hands will damage the window. |
- Insert the new or cleaned axial pre-optics window into the assembly.
- Screw in the axial window nut into the assembly.
To install the axial pre-optics window assembly:
- Tilt the top of the axial pre-optics window assembly towards the back of the instrument and then slide it up into the housing.
|
Do not hit the RF coil. |
 |
You must replace the axial pre-optics window assembly before fitting the cone. The cone will not fit properly if the axial pre-optics window assembly is not installed. |
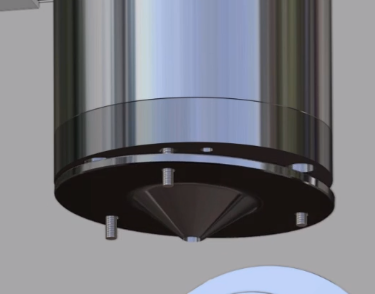
Figure 4. Cone inserted without the axial pre-optics window assembly
- Align the holes in the assembly with the screws and then push the assembly in.
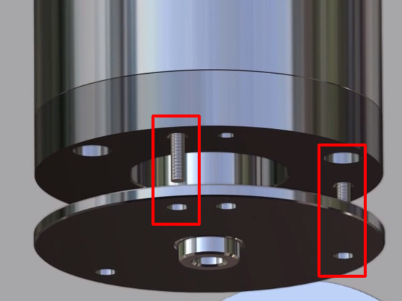
Figure 5. Align axial pre-optics with screws
- Install the cone onto the assembly.
- Tighten the three thumb screws firmly by hand.
|
If the thumbs crews holding the cone in place are not tightened firmly enough the cooling properties of the cone may be affected. |