Autodilution
This option is only available in the ICP Expert Pro feature pack. When using the ADS 2 or an ESI Autosampler with the ESI prepFAST Autodilution System, ICP Expert can be set up to control sample dilution and calibration curve creation.
The following information is provided on this page:
About Autodilution
After enabling the ADS 2 or ESI PrepFAST, additional fields on the following worksheet pages appear to configure the autodilutor settings.
- Elements - Create Dilution List for specific wavelengths that will have reactive dilution enabled, or, manually enable reactive dilution on a specified set of wavelengths.
- Conditions - Enter the reactive dilution rinse time. Defines how long the rinse time is to clean the nebulizer and spray chamber. The rinse occurs before the reactive dilution occurs.
- IEC - Enter the reactive dilution trigger percentage. When IEC wavelength concentrations exceed the entered limit during sample analysis, reactive dilution is triggered.
- Standards - Setup autocalibration. Define stock standards and required dilutions. Set up your system to autodilute your standards and configure calibration curve parameters using the Autocalibration Assistant.
- Sequence - Setup prescriptive dilutions. Define a set automatic dilution for each solution. Pre-run actions, the ability to enable reactive dilutions for QCs and to choose whether to count reactive dilutions as samples are also included on this page.
- Analysis - All repeated measurements are displayed with the original measurement. Select how to display the results.
About Reactive Dilution
Reactive dilution will perform a dilution on a sample in the following priority:
- If an internal standard measurement falls outside the defined recovery limits.
- If any of the selected analyte or interferent wavelengths return a calibration overrange.
- If any wavelengths in the method return a detector overrange.
You can define the wavelengths to reactively dilute either on a per-solution basis or across the entire worksheet. If the result of the selected element is outside of the specified limits, ICP Expert will automatically dilute and then rerun the sample.
Reactive autodilution adds diluted solutions immediately after the sample that triggers the reactive dilution. This may result in additional recalibration or rate driven QC blocks being generated. Rate driven QC blocks generated as a consequence of reactive autodilution will not contain sample-paired QC solutions (DUP, MSPK, MSD, QCSPK, SER).
Calculation to determine a dilution factor for analyte or interferent reactive dilution
Target dilution factor = observed concentration / Upper limit / X
X = factor determined by Reactive dilution aim selected on the Standards page.
Middle of the calibration curve X = 0.5
For lower end of the calibration curve X = 0.1
Upper limit = reactive dilution trigger % x concentration of highest calibration standard
The candidate dilution factor equals the dilution factor from the below list that is equal to or greater than target dilution factor:
2, 5, 10, 25, 50, 100, 150, 200, 250, 300, 400
Calculation to determine a dilution factor for detector overrange
Target dilution factor = 30,000,000 / intensity of highest calibration standard
The candidate dilution factor equals the dilution factor from the below list that is equal to or greater than target dilution factor:
100, 150, 200, 250, 300, 400
 |
ISTD wavelengths cannot trigger a detector overrange, only analytes or interferents. |
Setting up a method with Autodilution
 |
This video demonstrates how to setup and run a method with Autodilution enabled. It also includes information on how to setup Reactive Autodilution, manual entry of dilution values used for calibration curves, and how to automatically dilute stock standard solutions by configuring calibration curve parameters using the Autocalibration Assistant. |
Method setup overview:
- Select the autosampler in the File > Options page.
- Open a worksheet.
- Enable the ADS 2 or ESI PrepFAST on the Configuration page.
- Select Enable Dilution Lists on the Elements page if using this feature to customize reactive dilution options for solutions.
- Select the wavelengths and assign solution types on the Elements page.
- Edit Dilution Lists if using that feature. Otherwise, select which elements to enable reactive dilution on.
- Enter the common and measurement conditions and set the reactive dilution rinse times (if applicable) on the Conditions page.
- If using IEC, enter the standards information and set the reactive dilution trigger percentage (if applicable) on the IEC page.
- Enter the number of standards required on the Standards page.
- Specify the maximum number of reactive dilutions that will be performed on a solution before moving on to the next solution on the Standards page (not shown in the video above).
- Manually configure, or use the Autocalibration Assistant feature, to configure calibration curve parameters on the Standards page.
- Choose the reactive dilution aim and enter reactive dilution trigger (if applicable) on the Standards page.
- Add your QC types, if applicable on the QC page.
- Edit the sequence information, add QCs to the sequence, select the start and end of run actions on the Sequence page.
- Enter the Dilution List name (s) to use for each sample (if applicable).
- Enter the Autodilution values if using prescriptive dilutions.
- Add the solutions into the autosampler locations specified on the Autosampler page.
- Start the run.
Enable the ADS 2 or ESI prepFAST Autodilution System
- Check that the ICP-OES, autosampler and ADS 2 or PrepFAST systems are turned on.
- Check the cables are securely connected.
- If you are using an ESI prepFAST Autodilution system, configure the loop size in the ESI SC application.
- Open ICP Expert software.
- Click File > Options > General.
- Select the correct autosampler, and COM port, if required.
- Open a worksheet.
- Select the Configuration tab.
- Select Autosampler.
- Select ADS 2 or PrepFAST from the Accessory drop-down menu.
- Select Enable Dilution List if required. How do I create a Dilution List and what is it?
Select the Autodilutor Loop Size and Syringe Parameters
ADS 2
These parameters will be applied to all worksheets with the ADS 2 enabled and are stored on the ADS 2. Always review the parameters after moving the ADS 2 from one spectrometer to another.
Loop Volume
- Open the ICP Expert software and enable the ADS 2.
- Click Instrument in the top menu bar.
- Click Configuration.
- In the ADS 2 Configuration section, choose the Loop volume from the drop-down menu.
- Click Set.
|
The loop size on the ADS 2 must be the same as the loop size on the AVS. |
Syringe Parameters
- Open the ICP Expert software and enable the ADS 2.
- Click Instrument in the top menu bar.
- Click Configuration.
- In the ADS 2 Configuration section, enter the Diluent syringe volume.
- Click Set.
|
This field is required when using the low elution syringes. You can find the calibration value to enter into the Diluent syringe volume on the barrel of the syringe. When using glass syringes, enter 10 mL. |
Syringe Purge
Syringe Purge (Hours) is used to ensure syringe contents are purged regularly.
- Open the ICP Expert software and enable the ADS 2.
- Click Instrument in the top menu bar.
- Click Configuration.
- In the ADS 2 Configuration section, enter the desired length of time, in hours, to elapse before a Syringe Purge occurs. The purge will be performed before the next dilution is performed.
- Click Set.
ESI PrepFAST Autosamplers
Configure the loop size directly through the ESI SC application.
Prepare the ADS 2
Initialize and prime the ADS and syringes.
- Open the ICP Expert software and enable the ADS 2.
- Ensure the rinse, carrier and diluent containers are full.
- Click Instrument in the top menu bar.
- Click ADS 2.
- In the ADS 2 drop-down menu choose Initialize or Prime.
Initialize resets the ADS 2 to the home position. Prime will flush the system and remove bubbles.
Enable and Create Dilution Lists
Dilution lists are used to configure elements and wavelengths for reactive dilution on a per solution basis.
On the Elements page, if Dilution List is selected, you will only see the Internal Standard (if one is selected) with a check box for Reactive Dilutions. All other elements can be assigned a Dilution List on the Sequence page.
|
If Dilution Lists is enabled, all elements can trigger reactive dilution even if they are not assigned a Dilution List on the Sequence page. |
- Open a new or existing worksheet.
- Select Autosampler and then the ADS 2 on the Configuration page.
- Select Enable Dilution List.
- Click the Elements page.
- Click Dilution List in the top left corner of the Elements page.
- Click New and name the Dilution List.
- Select all desired elements that reactive dilution will be enabled on.
Removing wavelengths from a Dilution List
- Open the Dilution List.
- Right-click on, or select, the wavelength in the selected element list.
- Select Delete from the menu or press Delete on your keyboard.
|
Elements present in a Dilution List, but not selected on the Elements page, are indicated with a background color in their row. |
Enable and Setup a Worksheet with Reactive Dilutions Using Dilution Lists
To enable reactive dilutions:
- Select Autosampler and then the ADS 2 or PrepFAST on the Configuration page.
- Select Enable Dilution List on the Configuration page to create lists that can be applied to solutions in the worksheet or leave it deselected to enable reactive dilution for specified elements in all solutions in the worksheet.
- Choose the solution type including Interferents (if used) and Internal Standards (if used).
- Click Dilution List on the Elements page and then select the desired Solution List. How do I create a Dilution List?
|
Reactive Dilutions for Internal Standards are performed on all solutions in a worksheet. See Enable and Setup a Worksheet with Selected Reactive Dilutions for instructions. |
- If you have selected an internal standard, enter the Minimum and Maximum Internal Standard Recovery on the Elements page. Reactive dilution will trigger if the internal standard recovery percentage is outside of the specified range.
- Enter the Reactive dilution rinse time (s) on the Conditions page to specify the rinse time to clean the spray chamber.
- Edit the Reactive dilution trigger in the Interferent Calibration Fit table on the IEC page, if relevant.
- Enter the number of standards required on the Standards page.
- Manually enter the standards information, or use the Autocalibration Assistant feature, to configure calibration curve parameters.
- Choose the Reactive dilution aim selection and the Maximum reactive dilutions on the Standards page.
- For calibrations with equal distance between standards, reactive dilution should aim for the middle of the calibration.
- For calibrations with exponentially increasing concentrations, reactive dilution should aim for the lower end of the calibration.
- On the Sequence page, type the Dilution List name, or wavelengths*, to trigger reactive dilution, for each sample in the Dilution List column.
|
* You can enter specific wavelengths instead of using a Dilution List to ensure only those wavelengths will trigger reactive dilution. When entering specific wavelengths, use the format "WL_1, WL_2", where WL_1 and WL_2 exactly match the name of the element in the Label column on the Element page. |
- Add your QC types, if applicable on the QC page.
- Edit the sequence information on the Sequence page.
- Select whether to enable reactive dilution for the QC solutions and then add QCs to the sequence.
- Select the start and end of run actions.
- Add the solutions into the autosampler locations specified on the Autosampler page.
- Start the run.
Enable and Setup a Worksheet with Selected Reactive Dilutions
Enable reactive dilution for specified elements in all solutions in the worksheet.
- Open a new or existing worksheet.
- Select Autosampler and then the ADS 2 or PrepFAST on the Configuration page. Do not select 'Enable Dilution List'.
- Click the Elements page.
- Select the desired wavelengths.
- Choose the solution type including Interferents (if used) and Internal Standards (if used).
- Select or deselect the required wavelengths in the Reactive Dilutions column.
- Edit the Reactive dilution trigger on the IEC page if using IECs.
- If you have selected an internal standard, enter the Minimum and Maximum internal standard recovery on the Standards page. If the internal standard recovery percentage is outside of the specified range, reactive dilution will trigger.
- Enter the number of standards required on the Standards page.
- Manually enter the standards information, or use the Autocalibration Assistant feature, to configure calibration curve parameters.
- Choose the Reactive dilution aim selection and the Maximum reactive dilutions on the Standards page.
- For calibrations with equal distance between standards, reactive dilution should aim for the middle of the calibration.
- For calibrations with exponentially increasing concentrations, reactive dilution should aim for the lower end of the calibration.
- Add your QC types, if applicable on the QC page.
- Edit the sequence information on the Sequence page.
- Select whether to enable reactive dilution for the QC solutions and then add QCs to the sequence.
- Select the start and end of run actions.
- Add the solutions into the autosampler locations specified on the Autosampler page.
- Start the run.
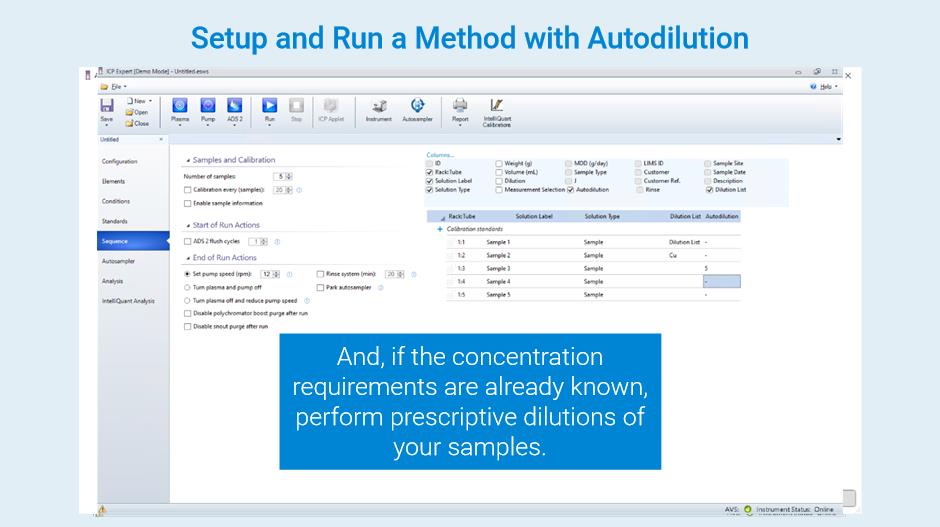
Setup a Worksheet with Prescriptive Dilutions
- Open a new or existing worksheet.
- Select Autosampler and then the ADS 2 or PrepFAST on the Configuration page. Do not select 'Enable Dilution List'.
- Click the Elements page.
- Deselect the wavelengths in the Reactive Dilutions column that will be run with prescriptive dilutions.
- Choose the solution type including Interferents (if used) and Internal Standards (if used).
- If you have selected an internal standard, enter the Minimum and Maximum internal standard recovery on the Standards page.
- Enter the number of standards required on the Standards page.
- Manually enter the standards information, or use the Autocalibration Assistant feature, to configure calibration curve parameters.
- Add your QC types, if applicable on the QC page.
- Edit the sequence information on the Sequence page.
- Enter the prescriptive dilutions for the relevant solutions in the Autodilution column.
- Select the start and end of run actions.
- Add the solutions into the autosampler locations specified on the Autosampler page.
- Start the run.
Setup Autocalibration on the Standards Page
There are 2 ways to set up ICP Expert to automatically create calibration curves.
- Manually choose the Stock Standard and enter the concentrations.
- Use the Autocalibration Assistant to configure standards to achieve required calibrations.
If the Stock Standard you wish to use does not appear in the options listed below, you may need to create a new entry in the Stock Standard Library before performing either of the two procedures listed below. How do I add or edit entries in my Stock Standard Library?
Manually Select and Enter the Concentration of Your Stock Standards
- Open a new or existing worksheet.
- Click the Standards page.
- Enter the number of standards.
- Select the checkbox in the Autocalibration column for each standard that will be created from a stock standard.
- Click in the From Stock column, then click again to show the drop-down list, and then select the desired Stock Standard solution.
- Select the Dilution Factor field and then type the value to enter the dilution factor.
- If the concentrations are not automatically populated, or to change the concentration, select the field and then type the value to enter the concentration of the required elements in the stock standard solution.
If an element's concentration is edited after a stock solution and dilution factor are configured, further changes to the dilution factor will no longer affect the concentration of that element for that standard.
Autocalibration Setup Using the Autocalibration Assistant
The ICP Expert Autocalibration Assistant can help determine the dilution factors required to create the calibration curves for your standards.
- Click the Standards page.
- Click Autocalibration Assistant.
- Select the elements that require generated autocalibrations standards.
By default, all elements are selected. - In the Autocalibration Definition section, enter the minimum and maximum concentrations for the calibration curve.
Theoretical calibration curves are generated as a reference and can be viewed by clicking on the concentrations for each element in the Autocalibration Definition table. - Enter the minimum number of calibration points required.
- Select or deselect whether to weight the points on the curve.
- In the Stock Inventory section, select the appropriate standard solution. You may need to scroll see all of the list.
The dilution factors and concentrations for each element are shown in the Generated Calibration Standards table. By default, all standards are selected to be imported. You can deselect any that you do not want added to the Standards table. - Select Append (to add to the Standards table) or Replace (to replace all items in the list).
Editing the Stock Standard Library
The stock standards library concentrations are in mg/L. The filter on the top right of the window can be used to quickly find the elements of interest and the stock standards that include them.
|
Changes to the library are automatically saved. Click Reset all to return to the default values for Agilent supplied libraries. |
To add a new stock standard to the library:
- Click the File > Options > Stock Standard Library.
- Select New to add a new Standard Library or right-click on the list and choose New stock standard. A new entry is added at the end of the list.
- Enter the Stock Name and then enter the concentrations of each element in that standard.
To delete a stock standard from the library:
- Click the File > Options > Stock Standard Library.
- Right-click on the stock standard.
- Select Delete Stock Standard.
To edit the element concentrations in the Stock Standards Library:
- Click the File > Options > Stock Standard Library.
- Double-click in the element of interest to edit the required concentrations.
Dilute and Run Solutions
Dilute and Run allows the user to select the solutions on the Analysis page to measure with a single specified dilution, or remeasure selected solutions using a new dilution factor.
To quickly remeasure solutions:
- Select the desired solutions on the Analysis page.
- Click Run > Dilute and Run on the toolbar.
- Enter the dilution factor and then click OK.
- Ensure all required solutions are present and then click Run.
All remeasured solutions will appear just below the previously measured solution. Click the arrow next to the remeasured solution to view the new results. Each new measurement will be appended with a number or the dilution value.
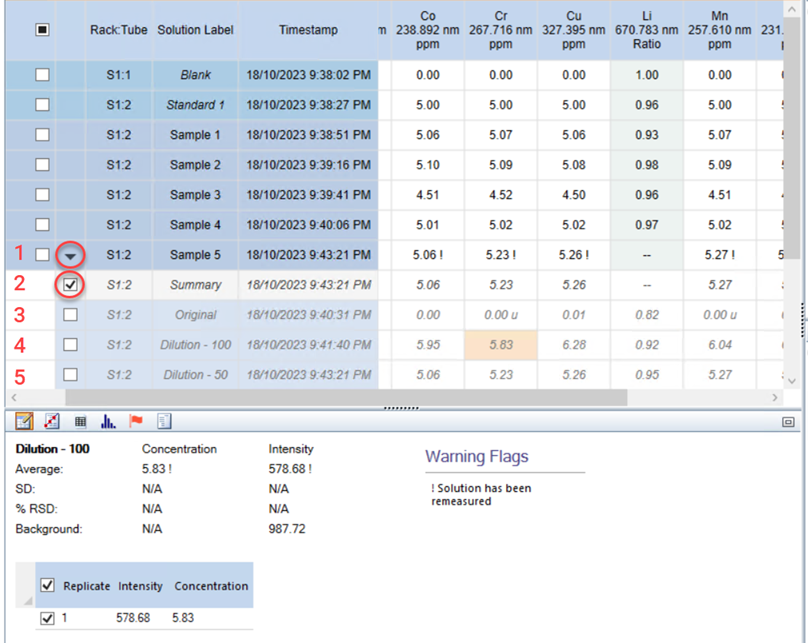
Viewing Diluted Solution Results on the Analysis Page
The image below shows the analysis grid features when a solution is reactively autodiluted. This view is the same for all diluted solutions.
- To view the diluted samples click the arrow indicated by the red circle in the row labeled 1.
- The tick in row 2 indicates that the Summary row is the iteration displayed. To manually change the displayed result for an individual solution, tick the desired row.
- Use the Measurement Selection menu to change the results displayed for all new measurements.
- Rows 3-5 are the results for the original and solution dilutions.
See also: