About the Start Page
The Start page is displayed when the ICP Expert software is started.
From the toolbar, you can start the Plasma, Pump, and the analysis, view the instrument status or the Autosampler page, and even create Applets and switch between Applet and full ICP Expert mode.
Using the selections on the Start page and File menu you can create or open worksheets, setup and create reports and report templates, access the Agilent website or shut down the software.
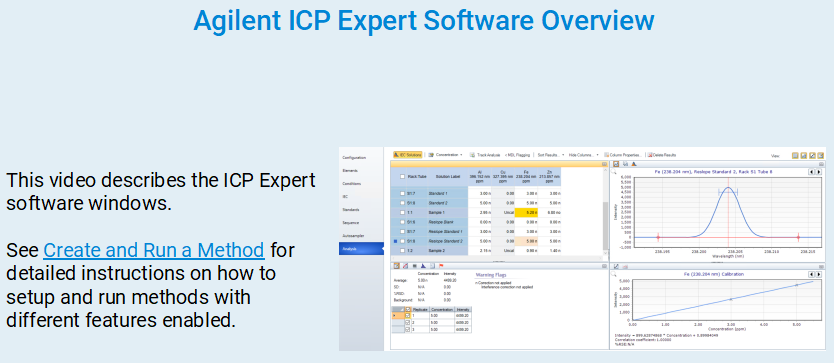 |
This video describes the different sections and pages within the software and shows how to navigate around the software. |
Create, Save, or Open a Worksheet
There are many different ways to create and open worksheets.
In the Open menu, click the 'pin' icon  next to the file name to ensure that it always remains at the top of the list. To remove it from being 'pinned' to the top of the list, click the 'pin' icon
  again.
 |
The default settings for new worksheets are determined by selections made on the Preferences screen of the Options window. |
Creating a New Blank Worksheet
To create a new blank worksheet:
From the File Menu:
- Click File > New (CTRL+N) or File > New IntelliQuant Screening (CTRL+SHIFT+N).
From the Start Page:
- Click New > Quantitative or New > IntelliQuant Screening.
Opening an Existing Worksheet
To open an existing worksheet:
- Click Open (CTRL+O) from the Start page or from the File menu.
- A list of recently used files will be presented, otherwise Browse for more files. The ‘Open’ dialog box will be displayed in this instance.
Creating a New Worksheet from an Existing Worksheet or Template
To create a new worksheet from an existing worksheet or template:
- From the File Menu:
- Click File >New From Existing (CTRL+T).
From the Start Page:
- Click New From > Open New From Menu.
- The 'Create New Quantitative Worksheet From..' dialog box will be displayed. When creating a new worksheet from an existing worksheet or template, Browse for more files.
The Worksheet window will appear with the new worksheet loaded.
|
All newly created worksheets are unlocked by default. |
- Click Create.
Save or Save As
To save your worksheet:
- Click File > Save (CTRL+S), File > Save as (F11) or the Save button on the toolbar drop-down.
- Enter the file name.
- Navigate to the appropriate location and then click Save.
Close a Worksheet
If you have unsaved changes you will be prompted to save before ICP Expert closes the worksheet. However, it is always best practice to save all changes first and then close the worksheet.
To close a worksheet:
- Click the X on the worksheet tab to close the current worksheet.
- Click File > Close.
- Press CTRL+F4.
Shut Down ICP Expert Software
If you have unsaved changes you will be prompted to save before ICP Expert closes. However, it is always best practice to save all changes first and then shut down the software.
There are a few ways close the ICP Expert software:
- Click
 on the Start page.
 - Click the X in the top right of the window.
- Click File > Exit from the menu.
Ignite the Plasma
- Turn on the external instrument exhaust and ICP-OES power to the instrument (if you have not already done so).
- Open the ICP Expert software.
- To start plasma ignition perform one of the following:
- Click the Plasma icon.

- Click the down arrow under the icon and then Plasma On.
- Press F5 on the keyboard.
- Click the Plasma icon.
- Ensure that you have completed the required conditions listed in the 'Plasma Ignition Requested' message that appears.
- Click Ignite.
|
The plasma will take approximately 60-80 seconds to ignite. If it fails to ignite, see Plasma not igniting for further information. |
 |
Tip |
Extinguish the Plasma
To extinguish the plasma:
- Click the down arrow followed by 'Plasma Off', or
- Press SHIFT+F5
Pump
Click the Pump icon  to select the peristaltic pump speed. Choose from 'Off', 'Normal (15 rpm)' or 'Fast (80 rpm)'.
Chiller
Select to turn on, or off, the chiller. This will only appear if a chiller is connected to the PC the ICP-OES is connected to.
ADS 2
This will only appear if an Advanced Dilution System 2 (ADS 2) is connected.
Click the ADS 2 icon to perform the following actions:
Initialize
Resets the autodilutor and sends the syringes and valves to their home positions. It is recommended to perform an Initialize after turning on the ADS 2 or after changing the syringes.
Prime
Fills the autodilutor tubing with carrier/diluent and rinse solutions. This will both prime and clean the tubing on the ADS 2.
Change Syringe
Purges liquid from the syringe and then moves the syringes to the replacement position.
- Click the arrow under the ADS 2 icon.
- Choose Change Syringe.
- When prompted, change the syringes.
- Click Next.
- Click Initialize to prepare the ADS 2 for use.
Stop
Used to stop the currently selected ADS 2 action. This is only available during the Initialize, Prime or Change Syringe procedures.
Run/Pause


Click the 'Run' icon to run an analysis using the current worksheet. The icon will then change to 'Pause', which you can click if you need to temporarily stop the run.
If you are using an autosampler, a dialog box will be displayed indicating which racks are required for the current autosampler setup. Check that the correct racks are in the autosampler, then click OK.
|
The Run button will only be available under the following circumstances:
|
Click here for information on how to Run a Batch of worksheets.
Stop an Analysis
Click the Stop icon  to stop the current analysis.
See also: