Advanced Dilution System ADS 2
 |
ADS 2 system control is only available with ICP Expert with the Pro feature pack installed. |
The ADS 2 offers automated control of known and unknown dilution needs.
- Reactive dilutions - triggered when signals are overrange to perform an automated dilution of a solution. Create Dilution Lists of required wavelengths and apply them to your worksheet or manually select wavelengths to trigger reactive dilutions
- Fixed dilutions - use when the dilution requirements are known, for example, stock standards needed to create calibration curves or high concentration samples.
- Autodilute standards - specify the dilution values, or a range and number of calibration values, and let ICP Expert determine the dilutions.
Additional information can be found on the following pages:
- See the Autodilutor page for instructions on how to configure software parameters to set up an analysis with Autodilution enabled.
- Install the ADS 2 hardware and run the ADS 2 performance test
- Install and remove the ADS 2 tubing
- ADS 2 maintenance including replacing the valve body, stator and rotor
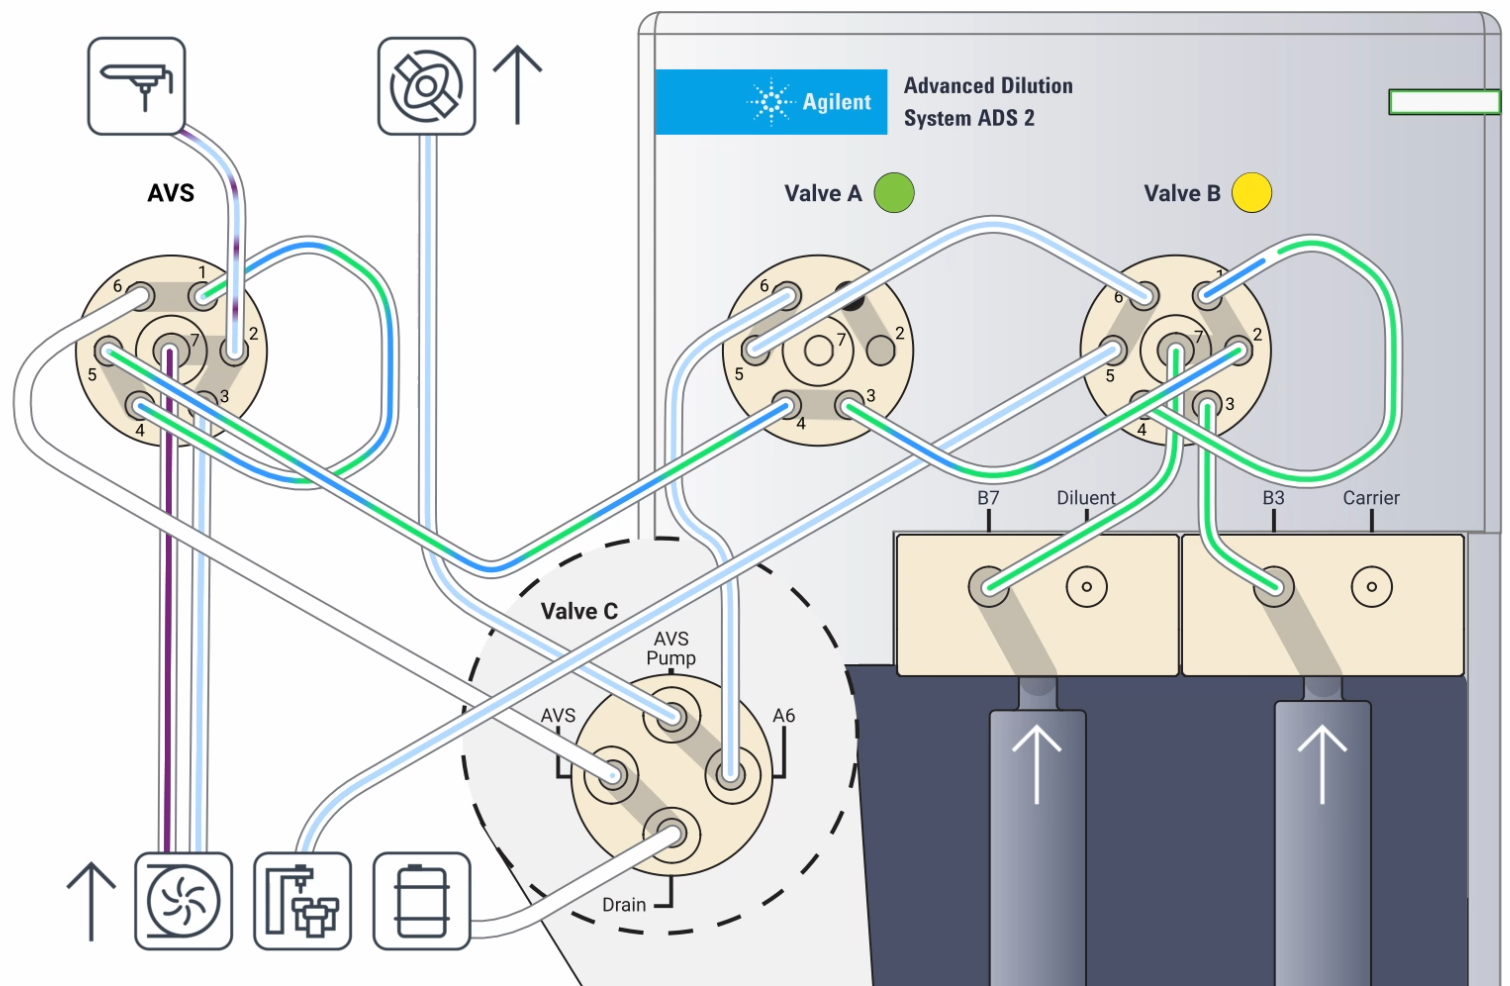
ADS 2 Flow Diagrams
Solution flows are handled by the autosampler, AVS 6/7, and the ADS 2 to help automate your analysis. This section describes how the solutions are delivered during all phases of an analysis.
The video below describes the solution flow paths for both a non-diluted and diluted sample.
 |
This video demonstrates the solution flow paths when using an ADS 2 and AVS 6/7 with Autodilution enabled during an analysis. |
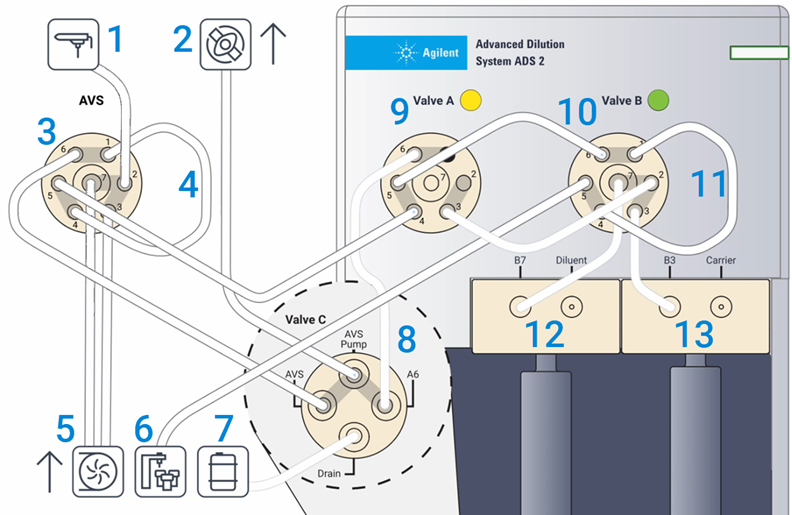
Where:
| 1. Nebulizer | 2. AVS pump | 3. AVS 6/7 switching valve | 4. AVS sample loop | 5. Peristaltic pump on the ICP-OES |
| 6. Autosampler | 7. Waste | 8. Valve C on the ADS 2 | 9. Valve A on the ADS 2 | 10. Valve B on the ADS 2 |
| 11. Dilution loop | 12. Diluent syringe | 13. Carrier syringe |
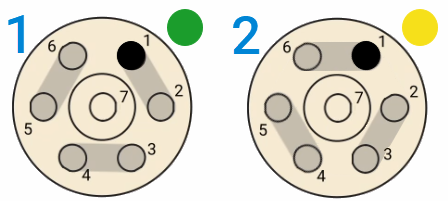
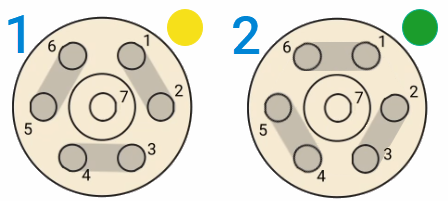
Valve positions
| Valve A positions | Valve B positions | ||
| Dilute | Bypass | Bypass | Load |
 |
 |
||
Initialization phase
This phase is not shown the video linked above.
Initialization is performed in four steps and runs through the syringe, valve positions and flow paths.
Step 1 - flushes the syringes and cleans the tubing
The ADS 2 Valve A is in the dilute position. Valve B is in the load position. The AVS valve is in the uptake position.
- The carrier and diluent syringes push solution into Valve B, through Valve A and into the AVS 6/7 sample loop and then out to waste.
- The AVS pump pulls rinse solution from the autosampler into Valve B through the dilution loop, through Valve A and then out to waste.
- The peristaltic pump pushes internal standard and rinse solution through the nebulizer.
Step 2 - reload syringes and cleans the tubing
The ADS 2 Valve A is in the bypass position. Valve B is in the load position. The AVS valve is in the uptake position.
- The syringes reload solution.
- The AVS pump continues to pull rinse solution from the autosampler into Valve B through the ADS 2 dilution loop towards the waste.
- The peristaltic pump pushes internal standard and rinse solution into the nebulizer.
Step 3 - prime syringes
Valve A is in the dilute position. Valve B is in the load position. The AVS valve is in the inject position.
- The carrier and diluent syringes push solution into Valve B, through Valve A, through the AVS 6/7 and then out to waste.
- The peristaltic pump pushes rinse solution through the sample loop and into the nebulizer.
- The peristaltic pump also pushes internal standard into the nebulizer.
Step 4 - clean AVS sample loop and nebulizer
Both ADS 2 valves are in the bypass position. The AVS valve is in the inject position.
- The peristaltic pump pushes rinse solution through the sample loop and into the nebulizer.
- The peristaltic pump also pushes internal standard into the nebulizer.
See also: